Installation and Start-up of YaCy

Since we provide YaCy as a generic release for all operation systems and a special 'flavour' for Windows users, we distinguish two different processes for installation. Windows users may want to switch to the Windows installation instructions, however, the following description is more general and applies to all operation systems:

General Instructions:

Please follow these steps:

1st Step:
de-compress the release

After downloading the latest release, simply decompress the archive with your favourite tool (which can be WinRar or WinZip on Windows, or Stuffit Expander on Mac OS X; Linux users type 'gunzip <release>.tar.gz' and 'tar -xf <release>.tar') and move the result to any place you want.

If you upgrade from a previous version of YACY, please migrate your settings and data. This is very easy: simply move (not copy) your DATA directory from the application root directory of the old YACY installation to the new application root directory. If done so, you don't need to do the other remaining configuration steps below again.

2nd Step:
Configure Network Settings

Change the proxy settings either in your network configuration or directly in you browser. Check the 'Use HTTP Proxy' flag and configure the IP and port according to the location of the proxy. If you do a single-user installation without changing the configuration in #2, the IP/Host shall be set to '127.0.0.1' or 'localhost', and the Port shall be set to '8080'.

3rd Step:
Start YACY

We supply some wrapper shell scripts to start the java processes:

  • on a MS-Windows system, double-click the file 'startYACY.bat'
  • on a Mac OS X system, double-click the file 'startYACY.command'
  • on a Linux system, start the file 'startYACY.sh'

4th Step:
Administrate the proxy

After you started YACY, terminal-window will come up. That's the application; no windows, no user interface. You can now access YACY's administration interface by browsing to
http://localhost:8080
See the 'Settings' menu: you should set an administration password and checkt the access rules. The default settings are fine, so please change them only if you know what they mean.

5th Step:
Use YACY and it's search service

Browse the internet using your web-browser. You should notice that your actions take effect as cache fill/cache hit log's in the httpProxy's terminal window. Whenever you vistited a page through the proxy, the page is indexed and can be search using the search page at http://localhost:8080. Please be aware that if your settings allow to access the http-server, then anybode else can also search your index as well. If you don't want this, you must set the 'IP-Number filter' of the 'Server Access Settings' in the 'Settings' menu to a string that applies to you local network scheme, like 'localhost,127.0.0.1,192.168*,10*', which should be fine in most cases.

Instructions for Windows and the Internet Explorer

1st Step:
Run Installer

The Windows release comes with it's own Installer in a single file. Just double-click the Installer file.

If you upgrade from a previous version of YACY, please migrate your settings and data. This is very easy: simply move (not copy) your DATA directory from the application root directory of the old proxy installation to the new application root directory. If done so, you don't need to do the other remaining configuration steps below again.

2nd Step:
Configure Browser

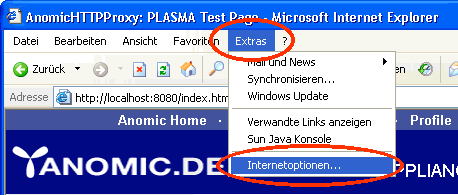
In your Internet Explorer, open 'Extras' -> 'Internet Options':
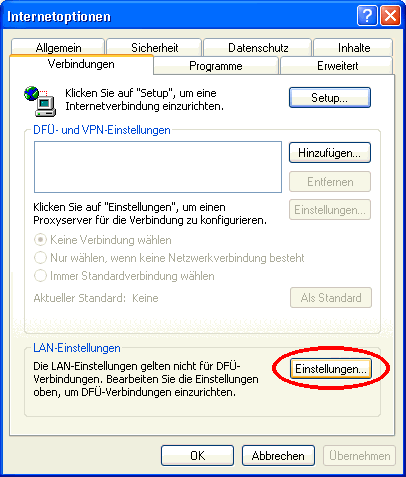
Select 'Connections':

Click on 'Settings' of the 'LAN-Settings', even if you are using a dial-up connection:
Check the 'Proxyserver' check-box:

Enter the location of YACY server. If YACY runs on the same machine as the Browser, set 'localhost'. If you have not changed the initial configuration, the port is '8080'. Check the 'No Proxy for local addess' button. Then hit 'Extended':

Un-check the 'Use the same server for all protocols' - button. Then remove the proxy setting from 'FTP', 'Gopher' and 'Socks'. In the 'Exceptions' field, enter 'localhost;192.168;10':

Close all windows by clicking on 'Ok'

3rd Step:
Start YACY

The installer creates a link to the application on the desktop. Just double-click the 'YACY Console' icon.

4th Step:
Administrate YACY

After you started YACY, terminal-window will come up. That's the application; no windows, no user interface. You can now access YACY's administration interface by browsing to
http://localhost:8080
See the 'Settings' menu: you should set an administration password and checkt the access rules. The default settings are fine, so please change them only if you know what they mean.

5th Step:
Use YACY and it's search service

Browse the internet using your web-browser. You should notice that your actions take effect as cache fill/cache hit log's in the httpProxy's terminal window. Whenever you vistited a page through the proxy, the page is indexed and can be search using the search page at http://localhost:8080. Please be aware that if your settings allow to access the http-server, then anybode else can also search your index as well. If you don't want this, you must set the 'IP-Number filter' of the 'Server Access Settings' in the 'Settings' menu to a string that applies to you local network scheme, like 'localhost,127.0.0.1,192.168*,10*', which should be fine in most cases.